
")


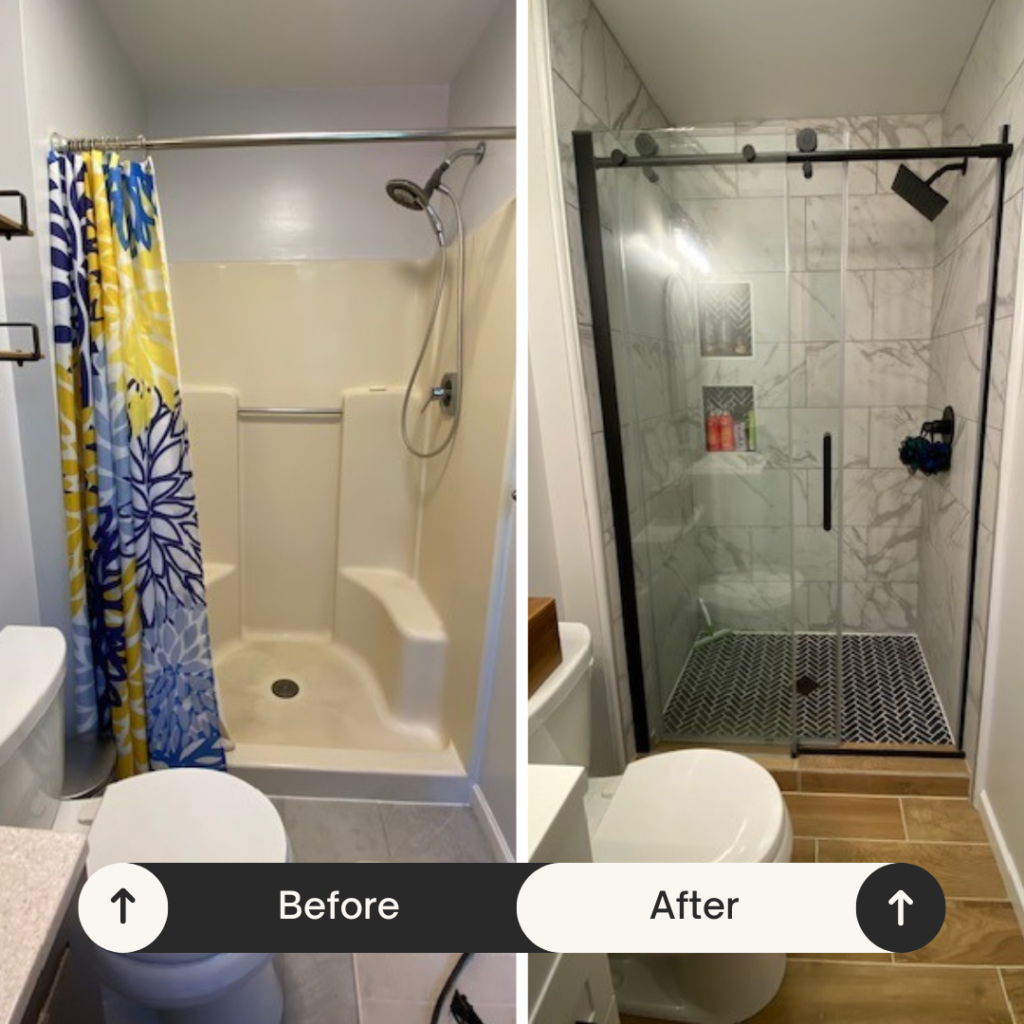
When we bought our home, it was almost perfect. Almost. We quickly tackled the paint colors that screamed “sterile” and started swapping out worn-out carpet to make our space feel warm and inviting. But the biggest challenge loomed: our small, hospital-like primary bathroom in desperate need of a remodel.
It wasn’t until June 2024 that we finally rolled up our sleeves and decided to take on the renovation ourselves.
My husband, bless his heart, dove in. He ripped out the old vanity, tore out the dated shower (goodbye, hospital vibe!), peeled up the floor tile and baseboards – basically, anything attached to the walls, except the light fixtures, was fair game.
I was buzzing with excitement, envisioning our new, private oasis just off our bedroom! In the meantime, our guest bathroom with its tub and shower became our temporary sanctuary. My only personal rule?
This remodel absolutely, positively could not take a year. Six months felt ambitious, but doable.
Well, as they say, life happens.
And sometimes, life involves a tricky little thing called leveling a shower drain.
After countless YouTube videos and a few desperate calls to fatherly figures for advice, it became crystal clear: we needed a pro.
Someone who genuinely knew their way around a bathroom remodel.
So, we tapped into our network, gathered recommendations from friends, and finally connected with a contractor in March 2025.
He was confident he could work within our budget, and we agreed on a plan: we’d source all the materials, and he’d handle the labor.
Two weeks. That’s all it took after our contractor started.
Two weeks, and our small primary bathroom remodel was complete!
I know taking on a project like this can feel overwhelming.
That’s why I’m excited to share what we learned, where we found our favorite products, and what essential things to look out for when you’re tackling your own small bathroom renovation.
Choosing the Right Tile for Your Remodel
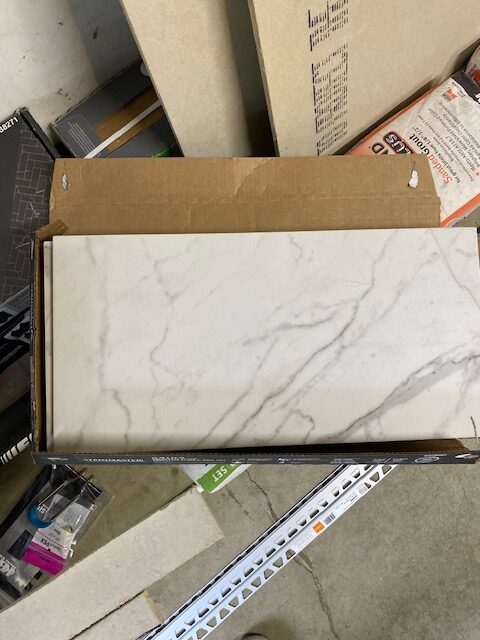
This was one of the hardest parts of the entire remodel. We had a vision, but finding the exact tile was a journey.
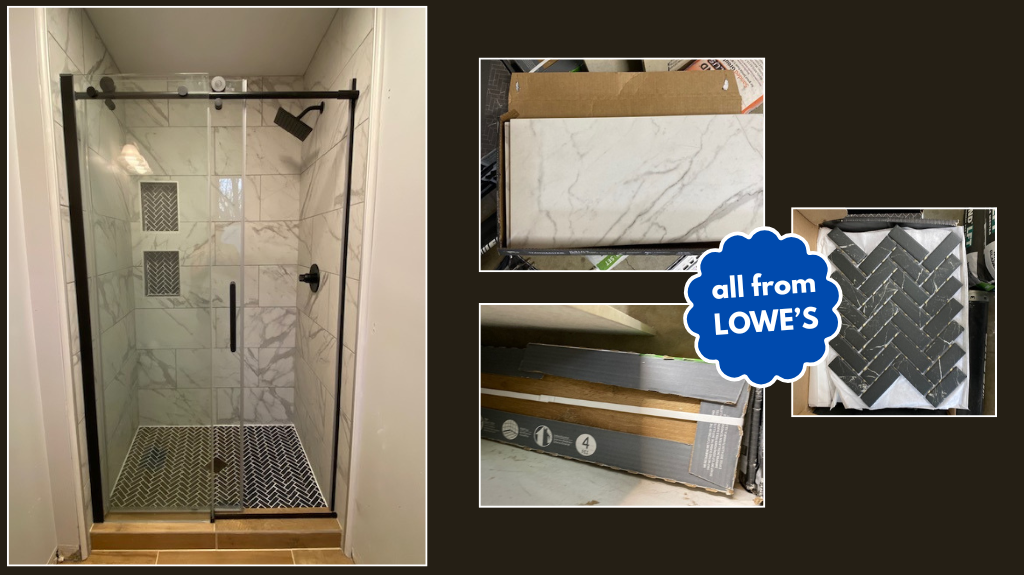
We went to Home Depot, Lowe’s, and even a fantastic local tile shop. Ultimately, the tiles that captured our hearts (and now adorn our bathroom!) came from Lowe’s.
Get a Sample First!
Before you even think about buying in bulk, purchase one or two pieces of each tile you’re considering. Take them home and place them in your bathroom.
Remember, store lighting is very different from your home’s natural and artificial light. A tile that looks bright in the store might appear darker at home. Therefore, investing in a sample is the best way to ensure you’ll love your final choice.
This is the exact tile pictured above that we used in our bathroom remodel.
Don’t Forget the “Run” Number
If you’re buying tile yourself, here’s a pro tip: always check the “run” number on the packages. Tiles from different manufacturing runs can have subtle variations in color. Matching these numbers ensures a consistent look across your entire purchase.
Small Bathroom Design Hacks
- Take the tile to the ceiling. This simple design choice makes your space feel bigger. Additionally, it draws the eye upwards, creating a seamless line that instantly makes the ceiling feel higher. This small trick made our small bathroom feel larger without adding any extra square footage.
- Choose hooks, not rods. Instead of traditional towel rods, we opted for hooks. This simple change instantly elevated the space, giving it a much more spa-like feel.
Want to try the matte black herringbone tile? Here’s the link!
Grout Secrets for a Flawless Small Bathroom Remodel
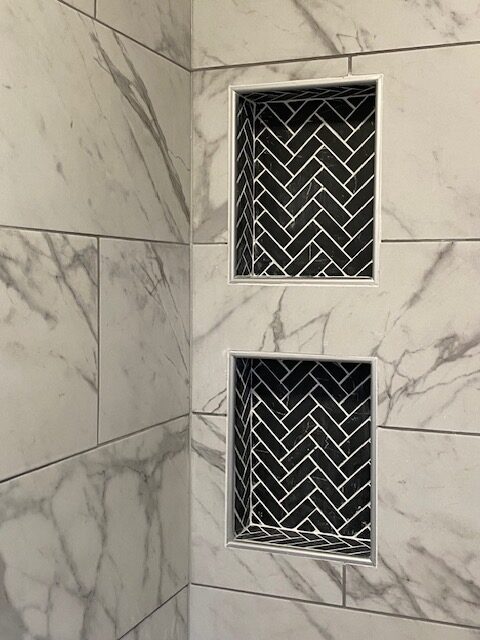
We used two different grout colors, and it made a huge difference. For the light gray wall tile, we chose a darker gray grout to make the texture pop.
On the floors, however, we went with a lighter “sandcastle” color. Our contractor advised against white grout on the floor, explaining it would show dirt much quicker. This was a brilliant decision for both durability and aesthetics!
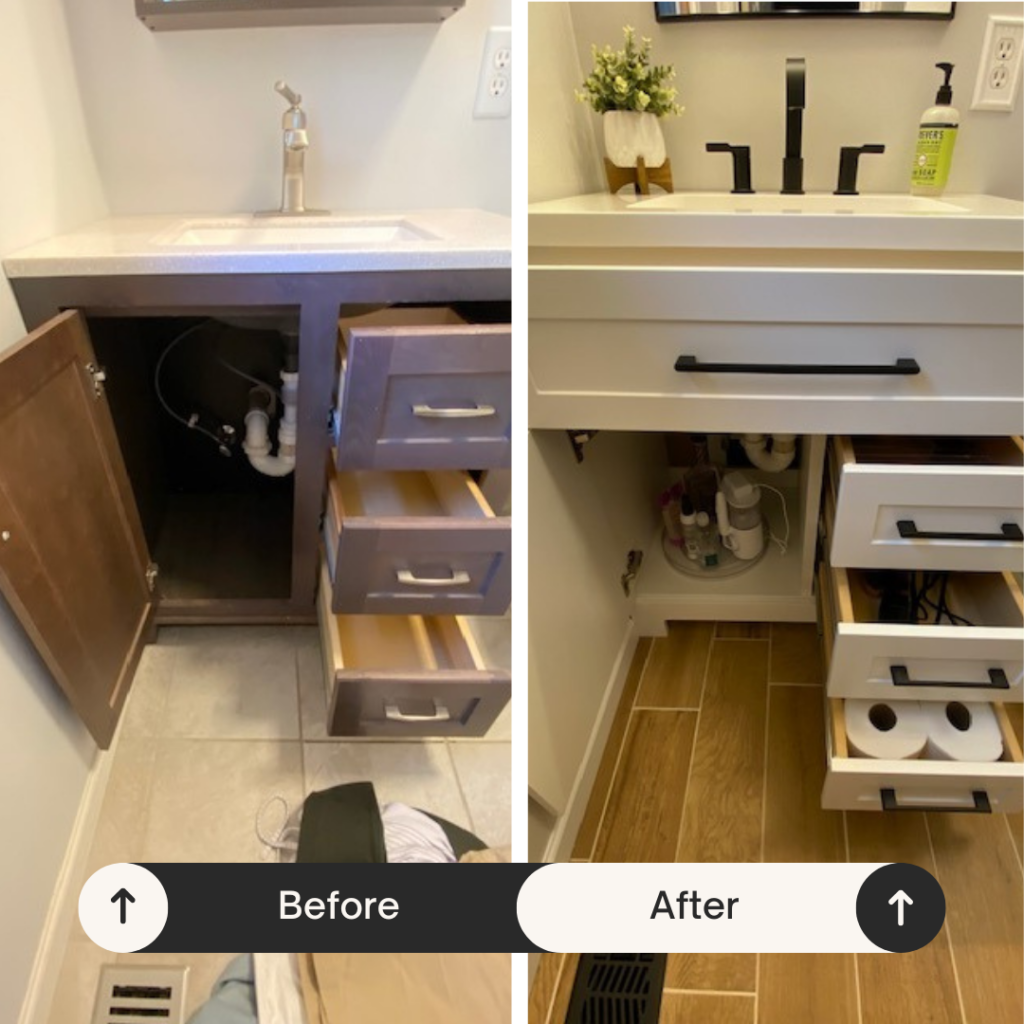
Smart Vanity Storage
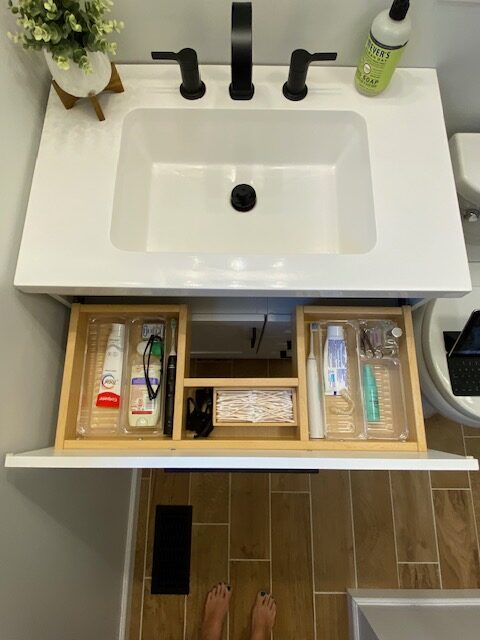
This vanity is, hands down, my favorite feature because it has a hidden top drawer! It’s sheer genius.
Instead of wasted space around the plumbing, this vanity comes with a clever top drawer cut around the pipes, providing incredibly valuable storage.
The vanity also features three regular drawers on the right and an open storage cabinet on the left.
The vanity also features three regular drawers on the right and an open storage cabinet on the left.
- I use one drawer for my “spa” essentials.
- A second drawer perfectly holds my blow dryer.
- The bottom drawer is ideal for backstock items.
Inside the cabinet, we placed a large lazy Susan. This makes it super easy to access taller products. Our main goal was to keep our countertop completely clear, and it’s working out great!
Finishing Touches: Fixtures, Mirrors & Paint
For all the fixtures, we went with a matte black finish. This includes the shower head, handles, and even the shower door frame. The lever for the shower was a great find on Amazon!
Our old fixtures were standard silver. However, the new matte black adds a modern look and a sense of calm.
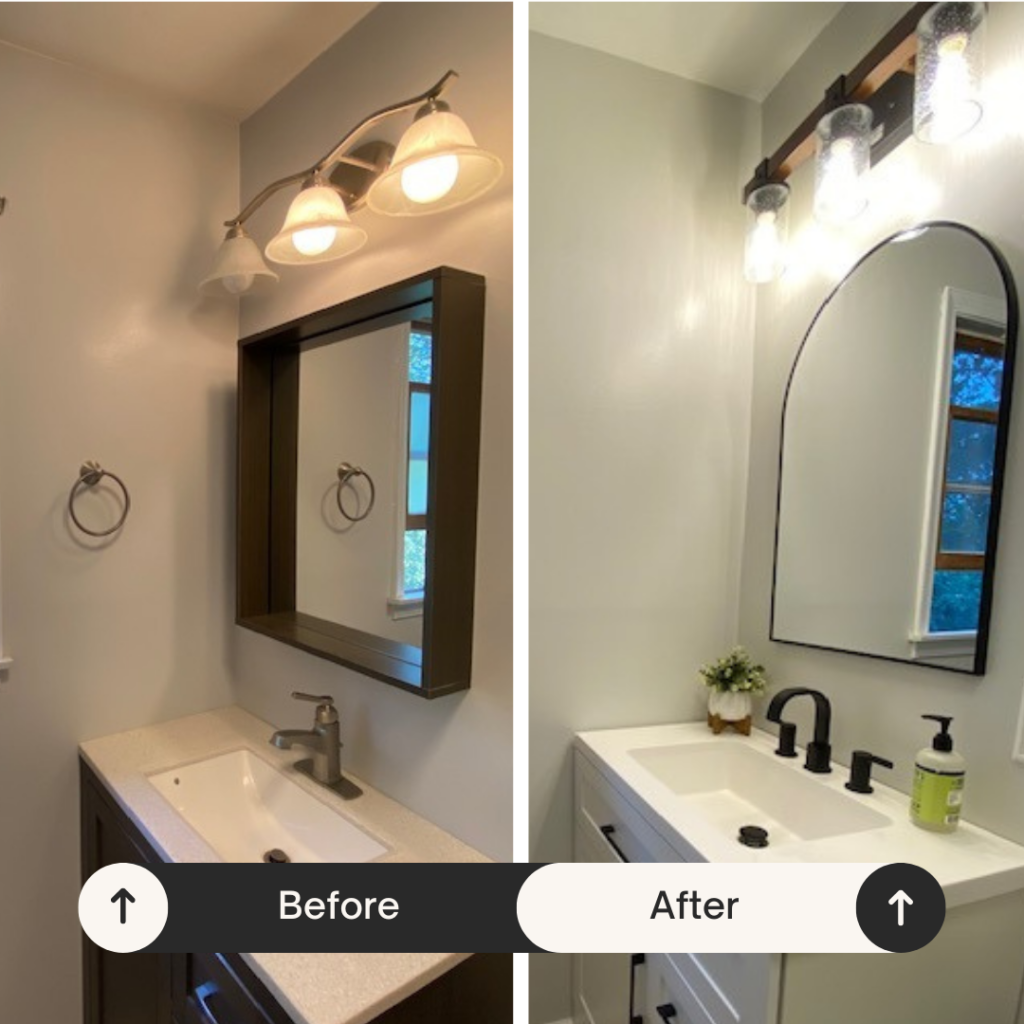
Hanging Arched Mirror
Our old mirror was thick and etched, which cast a shadow over the sink.
I found a new mirror with a sleek black frame and an elegant curve. It instantly brightened the space.
The Lighting Fixture
Our new fixture with its wood-look accents perfectly complements the wood-like tile in the shower.
Its matte black details tie into all our new fixtures, creating a cohesive and polished look. new fixture from Lowe’s, and I absolutely love it.
The Paint Color
We chose “Seashell Gray.” This soft hue makes the wood-look tile in the shower truly pop and creates that “oasis” feel we were after.
As a lighter color, it also helps our small bathroom appear more spacious.
This is also a fantastic time to give that ceiling a fresh coat of paint – just be sure it’s a true white before you start!
We didn’t and the ceiling was painted 3 times… once in Seashell Gray and then two coats of white once we realized what happened.
The Vent
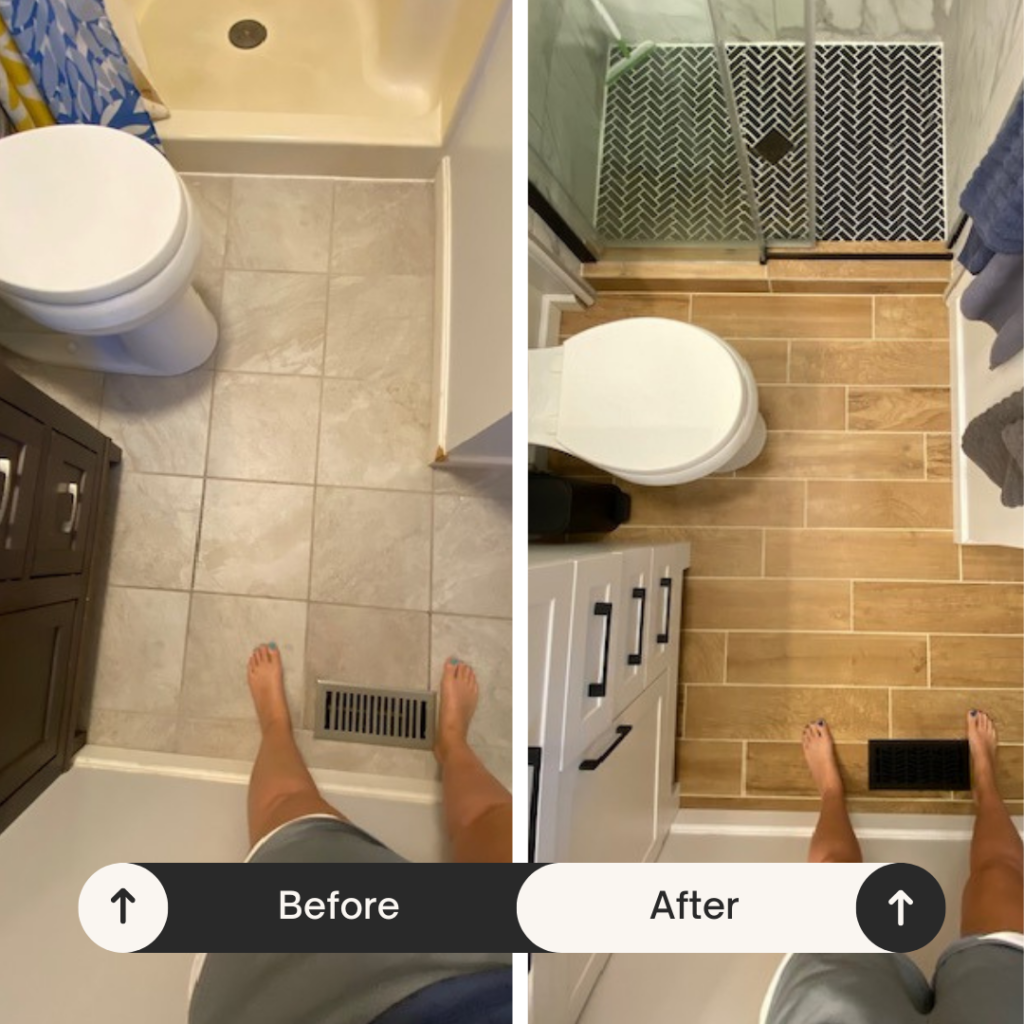
We changed the color of our floor vent from silver to matte black. This small change made a huge impact!
Light Switches and Outlet Covers
We also upgraded these small details to match the rest of our home, creating a more cohesive and pleasing aesthetic for our small bathroom remodel.
Seeing Our Small Bathroom Remodel Dream Come to Life
Our small bathroom remodel was a journey with its share of surprises, but seeing the final result makes every decision worth it.
It’s amazing what a difference thoughtful choices in tile, fixtures, paint, and even the smallest details like a vanity drawer or a vent cover can make in a compact space.
For all the products, fixtures, tiles, and accessories, I’ve created clickable links throughout this post but also in my Lowe’s Storefront here.
Please note, I am an affiliate with Lowe’s and Amazon so when you click on these links and buy from my recommendations, you are also supporting my small business. Thank you in advance!
Professional Organizing Services
Transforming a small space like a bathroom can feel daunting, but intentional choices and smart systems make all the difference. My goal is always to help you create spaces that are not just beautiful, but also highly functional.
If you’re feeling inspired by this remodel and ready to tackle your own organizing projects, here are a few ways I can help:
- Hands-On Guidance: I offer personalized organizing services to help you declutter, create smart systems, and set up your space for long-term success.
- Dive Deeper: Check out my other posts for more practical tips and insights from a professional organizer.
FREEBIE: Grab my Declutter Decision Toolkit for free when you join my email list! More decluttering and organizing tips, hacks, and strategies sent right to your inbox every Wednesday! Scroll to the bottom and sign up below!

Bonnie Hintenach | Bin your Space
Professional Organizer for Homes and Classrooms
Maryland Organizer


